Showing posts with label Android Tips. Show all posts
Showing posts with label Android Tips. Show all posts
There are many countries that ban Google and therefore the Google Play Store. There are also countries that can access it, but are limited to free apps and games. In another scenario, some devices don’t have it pre-installed, like Kindle tablets. Finally, many users are simply opposed to the use of Google products, including the Play Store. Today we are going to talk about alternative app stores for if you can’t access the Google Play Store, or just choose not to.


GetJar
GetJar is an alternate app store app that has a huge array of free apps to download. These can be filtered with the categories (and subcategories), which are mostly the same as in the Google Play Store, such as Productivity, Finance, Photos, among other choices. GetJar isn’t just for Android phones either, it has cross-platform support (iOS, BlackBerry, Windows Mobile etc). To be able to get the GetJar app on your device, you must first go to the mobile website in a browser app and install it. GetJar also has user comments (likes and dislikes, and Facebook support). There is also a Getjar Gold system and rewards app which provides tailored apps and lets you win rewards to then get premium apps and upgrades, free of charge.
SlideMe
Another alternative app market is SlideMe, which offers free and paid Android apps, which are also rated by users from the site’s large community. What's more, all apps in the database have been manually approved after testing. The apps can be filtered, with options such as newest, updated, ratings, as well as other categories, like education, lifestyle, languages etc. The app is available in multiple languages and many currencies are accepted. The SlideMe app can be installed for free from their website.
Amazon Appstore for Android
Amazon also has an Appstore for Android, where you can get thousands of both free and paid apps....and sometimes paid apps for free. The apps are divided into various categories, including new releases from the last 30 or 90 days, and they are also rated by users. In order to get the app store on your Android device, you must first ensure that apps from Unknown sources is accepted like mentioned in the linked tutorial above. Then you need to install the App Store or scan the QR code. Another way is to have a link sent to your mobile number or email. When the download is complete, tap on the AmazonApps-release.apk, press install and then open. If you don't have an account, you will be asked to set one up. Kindle Fire users will already have this store pre installed.
F-Droid
Another app store is F-Droid, which you can install from their website. This app in particular offers apps which are free and have open source software (FOSS), which allows anyone to use or copy the freely licensed software in any way. Unlike other app stores, F-Droid is funded by donations. The apps themselves don’t have reviews or ratings.
AppsLib
Appslib is a bit different from the others in that it offers apps for Android tablets only. You can install the AppsLib app from the website and onto your tablet, where you must then create an account. Apps are approved to ensure that they are optimized for tablets, and are split up into categories. Payments are done via Paypal and you can also get some information from other users with ratings and comments. To create an account, you must choose a device from the list, and unfortunately, there aren't that many brands, mainly Archos, Arnova, iMuz, Lazer, Naxa, TouchTablets and Lenco tablets, among other ones.
This is a two-part question: how to download your own content on Google Play, either uploaded or bought, and how to listen to music offline (we recently shared how to save radio stations for offline listening too). Google Play Music is a one-stop shop for many of us, and it certainly covers a lot of the bases for streaming music and paid purchases. But sometimes you really just need to have some music on your local storage. Here's how to do it.


Note: not all Play Music features are available in all countries and some require an All Access pass. In this case, any downloaded content will only remain on your phone while your subscription is active.
If you've previously stored your own collection of paid or uploaded content in the Play Music's locker, you can grab it again anytime you would like. Go to Auto-Playlists and into Free & Purchased. Whenever you play a track from this list, it will be cached and available even when you're offline. If you clear the cache in the Play Music settings or in your Android settings menu, you will lose the songs from your device (as it has not actually been downloaded). While this is not technically downloading, it is a handy trick.
If you want to download for real, you'll need your computer. Simply find the track or album you want in Free & Purchased (in the web-based Play Music) and click the overflow button (three stacked dots) and then Download. That's it – you can then transfer it to your Android with a USB cable or wirelessly as you normally would. Please note that you can only download a track twice. If you want to download multiple items at once, just hold shift when you click the titles and then right click to bring up the menu with the Download option. You can also install Google Play's Music Manager on your PC if you want to download and manage your entire collection. Shared music cannot be downloaded however.
f you want to save a tune you haven't bought for offline listening, you can do that too, but you'll need an All Access pass (which you can trial free of charge for one month). Back on your Android, just tap the pin icon on an album or song and your device will download it for offline listening. You can also hit the overflow menu and select ''Keep on device.'' An orange circle around the pin icon shows your progress (it also shows up in the notifications shade) and once completed, the pin icon becomes orange to show the album or track has been saved to your device for offline listening.
To remove it, just tap the pin icon again and confirm the message that pops up. Once your subscription expires though you'll lose the music from local storage.
1. Clear Your App Cache (30 seconds)
Over time, your programs write to the app cache on your phone and eat up precious system resources while slowing everything down. You can clear the cache on any individual app by visiting its property page in the Settings menu and tapping the clear cache button, but with dozens of apps on most phones, it could take an eternity to do this manually.
App Cache Cleaner, a free app, makes it easy to delete the cache on all your apps at once with just a couple of taps. After installing and launch App Cache Cleaner, simply tap Clear All and you’re done.

Of course, the cache will fill up again over time, and you’ll want to delete it again. App Cache Cleaner has an Auto Clear feature. If you enter its settings menu, tap Auto Clear Interval and select a duration, it will automatically clear the cache on a regular basis. However, this means that the app needs to run in the background.

2. Disable or Uninstall Unused Apps (60 seconds)
You may not know it, but many of the apps you never even use may be running in the background, eating up precious system resources. From the app that you tried for 5 minutes last month to the shopping app that came preloaded on your phone, every unused app has the potential to weigh your phone down. It’s easy to uninstall apps you’ve downloaded yourself, but crapware is a little harder to dispose of.
If you have rooted your phone, you can completely remove every trace of your preloaded apps. If not, you can still disable those apps through the settings menu. It should take about 10 seconds to uninstall or disable each app you don’t want. It should take you approximately one minute to get rid of 6 apps, longer if you have more crapware to dump.
3. Install a New App Launcher (30 seconds)
Your phone’s app launcher controls your desktop, lock screen apps menu, and other critical parts of the UI. Though every Android phone comes with its own preloaded app launcher, you can install a third party launcher that will not only change the look and feel of your device, but also speed the time it takes it to navigate around the OS. There are many different launchers available in the app store, but we found Lightning Launcher Home to be among the fastest and easiest to use.
To use Lightning Launcher or another launcher of your choice:
Install Lightning Launcher from the Google Play store.
Tap the Home Button. A menu appears asking you which launcher you want.
Select Lightning Launcher and Tap Always.

4. Remove Unnecessary Widgets and Shortcuts (30 seconds)
Even with a speedy App Launcher installed, your phone will use more memory the more widgets and shortcuts it has in memory. Look through your desktops for widgets you don’t absolutely need and remove them by long pressing and dragging them off screen.

A number of phones with widgets that advertise services such as media stores or news services. Unless you really want to look at a list of hot YouTube videos or Google Play Books on your home screen every day, remove these.
Dragging half a dozen shortcuts and widgets off of your desktops should take 30 seconds.
5. Limit or Disable Background Data (10 to 60 seconds)
Your email, your Gmail, your Facebook, your Twitter and your backup app all want to ping the Internet for data on a regular basis. All that syncing not only eats up your battery, but also takes up system resources and slows your device down.
There are some services you may want to sync in real time, but there are others you can check manually. For example, if you don’t need to be alerted the moment you get a Facebook mention or receive an email to your personal account, you can prevent those from connecting in the background.
To disable background data for all apps:
1.Navigate to Settings.
2.Tap Data usage.

3.Launch the context menu by tapping the three dots in the upper left corner of the screen or hitting the menu button (on Samsung and LG phones).

4.Toggle Autosync data to off and tap Ok on the warning that comes up.

To disable background data for Gmail, Google+ and other Google Services:
1.Navigate to Settings. You can get to the Android settings menu from the notification drawer or apps menu.
2.Tap on Google under accounts.
.jpg)
3.Tap the account name. If the sync icon next to the account name is green, it has sync permission. If it is gray, syncing is already disabled.

4.Toggle all types of data syncing to off, including email, contacts and calendar.

No matter what device you own, you're probably still using the stock Contacts app. If you're anything like me, your contacts list is just as messy as your MP3 library, with dozens of unnamed and duplicate entries you'll probably never get around to tidying up. I'll share a couple of simple tips for you here to get your Android contacts looking shiny and new.
.jpg)


Who gets displayed
This is the quickest and easiest way to make sense of the jumble of contacts in your list. If your contacts are spread across multiple social networks, email accounts and instant messaging services, you've probably got multiple entries for the same person and lots of unused ones as well. If thinking about it logically isn't exactly your cup of tea, just experiment by ditching some lists until you get the mix you like. If you have some no name entries like in the screenshots, just open them to see what service they are associated with.
If you don't mind thinking about it though, then the best way to approach it is not to think about which services you want listed, but what services you actually want to have direct access to from your Contacts app. So, if you only ever Skype people from within the Skype app – not from your Contacts list – then you can freely uncheck that box. Personally, I tend to use the Contacts app for dialing, WhatsApp and emailing. Depending on how you use your Contacts app, you can be selective about which services to show in your contact list. Perhaps you only need your Google account showing up? It largely depends on where you save your contacts in the first place.
Merge contacts and choose profile pics
If you've somehow ended up with six different entries for the same person, you can also merge contacts into one. Just go to that particular contact's ''profile'' and hit the action overflow button in the top right. From here hit Edit and then once you're in the contact editor, hit the action overflow again, where you'll find the option to Join. Then, just find all contacts entries for that person and stitch them all together. If a contact is missing a profile picture, you can tap the empty profile square, then again in the popup, then again in the contact entry and finally select from the camera or elsewhere (or you can use an app, mentioned at the bottom of this article).
Aside from changing the look of the Facebook user interface with the recent update, which hasn’t been that warmly welcomed by users, there is yet another Facebook feature that can be quite annoying: video auto-play. Not only do you not always want to see what people are showing, but this also uses up more of the data (if your plan isn’t unlimited) and battery of your Android. Here is how to disable this feature on Android and PC.
First off, I just want to clarify that you can’t actually disable automatic video playback completely. The only available option in the update is to choose whether or not the auto-play videos will occur on Wi-Fi only. This means that when the box isn’t ticked, auto-play will happen when using mobile data. Check this box so that none of your precious data is used for some silly videos.


First off, I just want to clarify that you can’t actually disable automatic video playback completely. The only available option in the update is to choose whether or not the auto-play videos will occur on Wi-Fi only. This means that when the box isn’t ticked, auto-play will happen when using mobile data. Check this box so that none of your precious data is used for some silly videos.
Facebook on your PC
When on the Facebook website on your personal computer, you can switch this feature off completely, though it won’t affect the settings on your phone. Sadly, the features on the website do not often coincide with the ones on Android, which we discovered with the privacy and security settings for Facebook. Go to settings, then videos and from the drop down menu, select off.
Whether you are new to Android and eager to try out every available option you see on the screen, or familiar with the system, including the annoyances that plague you on a daily basis, tips and tricks to get around a system is always helpful. We are here to help you with that.




1. Disable App Notifications
Bugged by annoying app notifications that just keep coming? If you don’t know already, these app notifications also drain your phone’s battery. If you want to turn them off, and you are on Jelly Bean 4.1 and above, here’s how:
- On any of your unwanted notifications in your notification bar, long press on the notification for a message box to appear.
- Tap on App Info > Untick Show Notifications > OK.
2. Disable Mobile Data
Whenever you don’t need to stay connected, disabling the Mobile Data can help keep your smartphone battery from draining too quickly. Turning off mobile data is as easy as:
- Going to Settings > Data Usage.
- Disable Mobile data by toggling the setting from ON to OFF.
3. Set Mobile Data Limit
Want to keep track of how far your usage is from your monthly mobile data limit? If you have ICS and above, there is a feature which lets you keep track of how much of the quota you have left.
- Head over to Settings > Data Usage.
- Set your data limit by dragging the orange line to reflect your monthly quota.
- Set your data usage cycle based on when your "month" starts and ends, and you’re done.
You will be alerted once you hit the limit you have set. Note that the tracked data usage of your phone may vary slightly than your carrier’s tracking.
4. Add Multiple Google Accounts
You need a Google account to use an Android phone but did you know you can choose to run more than one Google account on your Android device. This is convenient if you use more than one account for several of your Google services. To add multiple Google accounts:
- Go to Settings > Add account.
- Select Google and setup your New or Existing Google account.
- Once added, choose what you want to sync with the account.
Repeat all the steps above if you want to add more accounts.
5. Disable Automatic App Updates
Prefer to read through app permissions and manually pick which app updates to adopt? You can, but first you need to disable your automatic app updates. Here are the steps:
- Open Play Store and head over to Settings.
- Tap on Auto-update apps.
- Choose Do not auto-update apps.
If you want to enable the auto updates, follow the same path and choose Auto-update apps at any time or via Wi-Fi (available for certain Android devices only).
6. How To Check For Android System Updates
For Android users that are using stock ROM, you may want to look for new updates to your system. To check for updates:
- Go to Settings > About phone/tablet.
- Tap on System updates.
- Tap Check now to look for system updates.
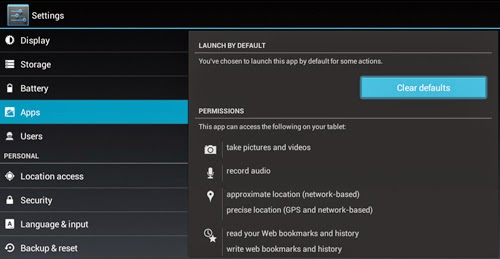
7. Changing Default Apps
If you have already set some default apps for particular tasks (e.g. using Chrome for opening web links) but wish to change this:
- Go to Settings > Apps.
- Swipe right and look for the All tab.
- Select the app you want to remove as default.
- Tap on Clear defaults.
8. Organize Homescreen Shortcuts With Folders
Once you have a lot of apps installed, your homescreen might be filled with app shortcuts. Unlike the app drawer, the apps on your home screen are not arranged alphabetically. So, you might want to create some folders for your homescreen shortcuts.
- Assuming you have more than a handful of shortcuts already on your homescreen, long presson any of the shortcuts and drag it onto another shortcut.
- A circle should now appear around the apps, indicating that a folder has been created.
- By tapping on the newly created folder, a mini window will pop up with your apps in it.
- You can drag and drop additional apps into the folder if you like. You can also rename the folder by tapping on the text area at the bottom of the mini window.
9. Disable Animations
Here’s a tip on how to make your Android device run a bit smoother: disable its animations. You will need to have access to Developer Options which can be found under Settings or About device.
Note: For some phones, you may need to go to Build number and tap on it repeatedly until you see "You are now a developer!". Developer options are now enabled.
Under enabled Developer options, look for Window animation scale, Transition animation scale, and Animator duration scale. Then, turn them off (disable) them one at a time.
10. How To Turn Off Auto-Correction
Hate the fact that your phone is going English teacher mode on you? Turn off auto-correction for peace of mind when texting.
- Go to Settings > Language & input.
- Tap on the settings icon next to the keyboard that you are using, e.g. Google Keyboard.
- Look for Auto-correction and tap on it.
- Select Off to turn auto-correction off.



.jpg)


